
Here we’ve prepared several ways to help you DIY a Sailor Moon cosplay wand, you may find one that you like.
Method One
Color printing: This is the most direct and simple way which is completely suitable for people who are not very good at handwork. You only need to print the accessories on the right parts of the following pictures by color printing. Cut each part of the wand and stick them together. A sailor moon wand made of paper is finished.
Advantage: simple, easy and quick.
Disadvantage: not very stereoscopic and vivid.
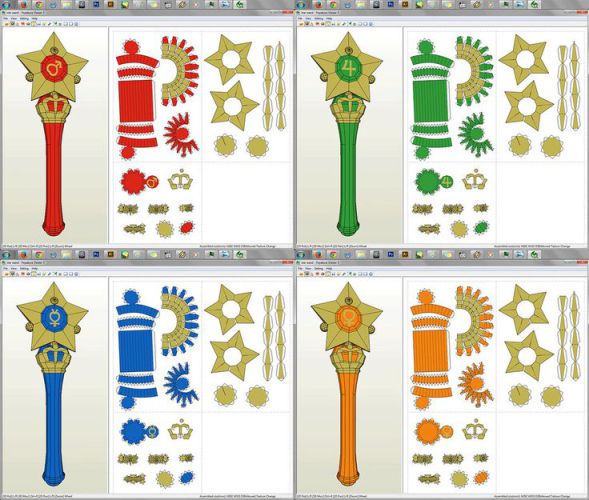
Picture found on pinterest.com
Method Two
If you would like to make a wand more stereoscopic than color printing, you can use 3D paper to make the wand. Of course it will be a little more difficult than the first method.
(1). Make a star as the following process by 3D paper, and draw the color and patterns as in Sailor Moon with paints.
(2). Roll a 3D paper to the shape of a cylinder as the bar of the wand and draw the color and patterns.
(3). Stick each part together with super glue.
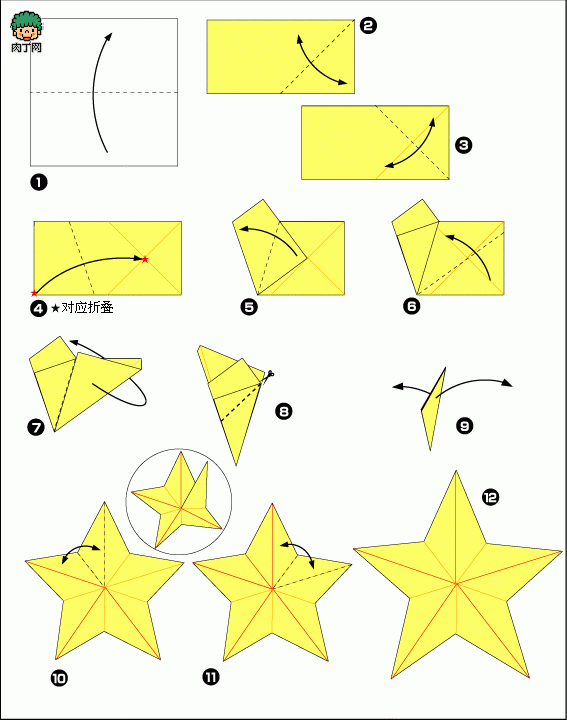
Picture found on rouding.com
Method Three
Use polymer clay and wood to make the wand. By this method you can make a completely stereoscopic wand.
Materials: (a). Part of Wood: a cylindrical wood, 4 wood balls (including one biggest, one smaller and two smallest balls), 2 heart-shaped wood (one of which is a bit smaller than the other one). (b). Part of Clay: a small bottle of polymer clay. (c). A utility knife. (d). A pair of disposable gloves. (e). Super glue.
Process: (1). Use the utility knife to cut the clay into the shape of a star, curve a smaller star along its edge. (2). Knead 5 tiny balls on the top of the 5 angles. The sixth angle is excluded because it will be jointed to the main part of the wand. (3). Poke holes at the positions shown in the above right picture. The size of the holes must fit the dowels. (4). Apply super glue on the dowels and insert the dowels into the holes to joint each part together. After the clay become dry, the wand is finished. Of course you can color it as in Sailor Moon.
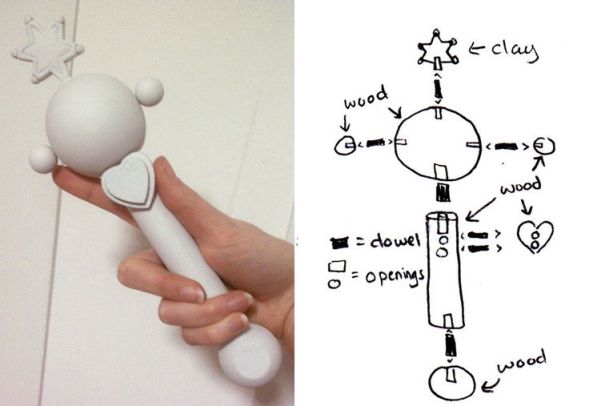
Picture found on pinterest.com
Method Four (Adapted from the article by Jellybean)
If you are quite good at handwork, the following steps of making a Sailor Moon’s crescent wand may be used as a reference. This way is more vivid and complex than the three methods mentioned above.
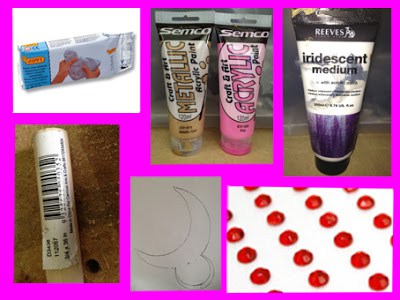
Materials:
Disposable plastic gloves
Piece of thin card as a template for the crescent moon shape
1x 500g pk of Air Dry Modeling Clay
Bowl of lukewarm water
Hot Glue Gun
1x tube of Iridescent Medium
1x tube of Acrylic Paint (Pink)
1x tube of Acrylic Paint (Metallic Gold)
Small Red Gems
Finished product shown below.
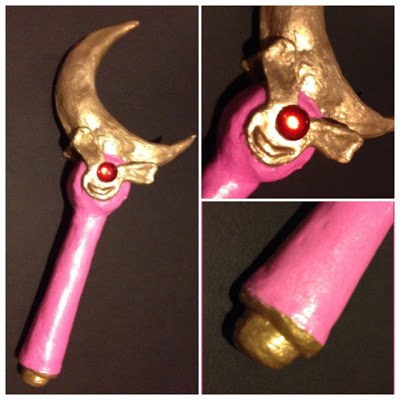
Method Five
This is to make the extended version of Sailor Moon’s Moon Stick as seen in the first arc of the manga. You can use this tutorial to make the traditional hand sized Moon Stick by using shorter/thinner PVC and making slightly different details.
Materials:
a. (3-4) 2oz packs yellow polymer clay (I’m using crastsmart brand from Michaels)
b. (1-2) 2oz packs white polymer clay
c. (1) small bottle pink acrylic paint (I’m using Apple Barrel in Bright Magenta 20591)
d. (1) small bottle yellow acrylic paint (I’m using Apple Barrel in Yellow 20502)
e. (1) small bottle pearly white acrylic paint (I’m using FolkArt in Metallic Pearl White 659)
f. (1) can pink spray paint (I’m using Krylon in Watermelon) (OPTIONAL way of painting)
g. (5-6) feet of 3/4″ in PVC pipe, cut into two sections (I’m 5’4″ and I’m using about 66″, or 5’6″ worth of pipe)
h. (1) 3/4″ PVC pipe coupling (used to connect the two pieces)
i. (2) 3/4″ PVC end caps
j. (1) 30mm or 40mm faceted crystal sphere (I buy mine here: [link])
size is up to you, 30mm is a bit bigger than a quarter I use this size for the regular size Moon Stick, and 40mm is about the size of a golf ball which I use for the tall Moon Stick
Click here to read the process.

Hope this article is helpful. Get started and make your own Sailor Moon Cosplay Wand!
